“Father used to say, there were no right answers. Have the light guide you.
”Justine, phonograph
The Library is the second area in the Cabinet of Perturbation, found in Amnesia: Justine. Another Suitor and the second hostage, Father David, are found here.
Information[]
The library contains a main room with five side chambers, one in which is the area's hostage, Father David. The fifth room, which is opposite the area's entrance, contains a projector. Four slides and numerous notes are found in this area, along with a boarded-up door which apparently conceals an angry Suitor (likely Basile). The room containing the hostage also features pictures of Justine and her parents.
The puzzle in this room involves using the four slides with the projector and "Puzzle Lock" to open a hidden passage. Failing to do so will result in Father David being "quartered," i.e. ripped apart by all four limbs.[1]
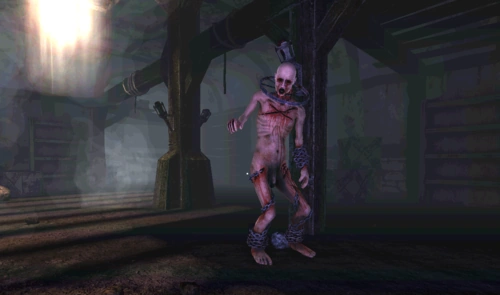
After completing the puzzle, the player will descend into a dark underground room where he or she will encounter Basile. The dungeon and tunnels are accessed from the library, though the door to the tunnels is jammed.
Layout[]

Walkthrough[]

- In the first room on the right, Slide 1 and a Note are on the desk. A Tinderbox is in the desk cabinet, and another is in the middle drawer. A second Note is found on the bookcase to the left of the desk.
- The first room on the left has Slide 2 on the right and two more Tinderboxes on the left. It is okay to use one of the Tinderboxes to light the lamp in this room, for no other reason that having better visibility.
- In the second room on the left, grab the Tinderbox on the bookcase on the right. At the back of the room, you may notice a shaft of light coming through the bottom of the empty bookcase. This will be your way out after you solve the puzzle (or kill the captive). Turning left from the empty bookcase, you will find Slide 3 on an upper shelf of the bookcase to your right.
- The second room on the right contains Slide 4 on the left and a Note on the right. The back of the room has the "Puzzle Lock" device, where Father David is imprisoned behind the wall. He can be heard through the grate. If you plan to save him, ignore the device for now.
- You get at most three incorrect attempts at solving the puzzle before he is killed. One or both of the slots being empty counts as incorrect. If you wish to kill him, you can simply pull the lever four times without placing any of the slides in the device.
- The room at the end of the hall contains a projector. Use a Tinderbox to light the candle inside. You can then place one of the slides in the small window at the front, which will project an image on the wall. This allows you to see the image that corresponds to each slide.
- Slide 1: Open arms, facing left
- Slide 2: Holding a sword, facing left
- Slide 3: Kneeling, facing right
- Slide 4: Arms akimbo, facing right
- A secret Note can be found in the bookcase on the right side of the room with the projector, hidden behind one of the books.
- The notes and the phonograph provide clues to which slides should be used, and in what order.
- In the phonograph, Justine emphasizes the word "right", hinting that the two right-facing slides are the ones needed to save Father David.
- "Results" hints that two slides with the figure facing the same direction must be chosen.
- It also hints that the slides correspond to moods, which is they key to interpreting the next note.
- "Soul Journal Entries" provides the most significant clue: the order of the slides. Each entry corresponds to one of the slides, in the following order: Slide 1, Slide 4, Slide 3, Slide 2.
- It also shows the association each slide has with a positive or negative mood.
- First entry: The bird cracking the snail's shell is a negative event, despite Justine showing compassion by comforting Clarice.
- Second entry: Further reinforces that the right-facing slides are the correct choice.
- Third entry: Monsieur Florbelle told Justine she should have picked Slide 2 the previous day, because she made a maid cry. Therefore, Slide 2 is negative.
- Fourth entry: Recounts an event where Justine was confronted by her father over her negative behavior.
- It also shows the association each slide has with a positive or negative mood.
- It can be inferred that Slide 2 is an incorrect slide, as it is violent in nature. Slide 1 may be intended to mirror the painting of Father David with his limbs chained.
- With these clues in mind, we know how to save the captive: Slide 4 on top and Slide 3 on the bottom.
- Return to the Puzzle Lock device, place the slides, and pull the lever. The correct solution will release Father David.
- When the captive is either killed or saved, the bookcase in the second room on the left will open. Go down the stairs and open the door to the cellar.
- Proceed with caution, as soon after entering, the torches will go out and Basile will spawn. Hide in the alcove at the far end of the room and wait for him to walk past you. Sneak your way into the room he came from and go straight ahead.
- When you pass the two chairs blocking the way to the exit, Basile will be alerted to your location. This seems to be due to the noise of bumping into the chairs or jumping over them, but it is more likely he is scripted to find you once you reach that area. Run to the left to take the exit to the Dungeon.
Collectibles[]
Puzzle items[]
Four framed stenciled slides can be found. Each slide is found in a different room, and each has a different picture of a man:
- Slide 1 – the one with open arms; depicts a figure facing left, with arms splayed out to each side in a T-pose; found in the first room on the right
- Slide 2 – the one with the sword; depicts a figure facing left, holding a sword straight out; found in the first room on the left
- Slide 3 – the one kneeling; depicts a figure facing right, hunched over and on the ground, prostrate on his knees; found in the second room on the left
- Slide 4 – the right one/the man on the right; depicts a figure facing right, with his hands on his waist; found in the second room on the right
Tinderboxes[]
- Two tinderboxes can be found in the first room to your right as you enter the library.(1 & 2)
- Another two can be found in the room on the opposite side of the one described above.(3 & 4)
- The fifth and final tinderbox can be found in the room opposite of the room where Father David is trapped.(5)
Notes[]
- Results – This note can be found in the first room to your right.
- Herbert's Letter – This note can be found in the same room as the previous note, on the bookshelf to the left of the desk. It can be a little tricky to spot.
- Soul Journal Entries – This note can be found in a table in the second room to the right, the room with the captured priest.
- Shipment Slip – Entering the room at the end of the hallway in the library and then taking a right and heading straight you will find yourself at a bookshelf. One of the books in this bookcase can be removed to reveal this note behind it. Finding this note will unlock the "Still Alive" Gold Trophy in the PS4 version of the game, as well as slightly altering the dialogue between Justine and Clarice at the end of the game.
Trivia[]
- There are many sacks of potatoes present in the cellar portion of the level, referencing the Potato Sack bundle that the expansion was a part of.
Gallery[]
")
")
Video[]
References[]
| Locations in The Dark Descent & Justine | |||||||||||
|---|---|---|---|---|---|---|---|---|---|---|---|
| |||||||||||